App Localization — iOS
This guide explains how to localize an iOS app for multiple languages/marketplaces.
Bundle Localizations
The first step in localizing an app is determining which languages you wish to support. Once this is determined:
Locate the appropriate
2-character ISO 639-1 language code for each.In the project
build.settingsfile, add these language codes to aCFBundleLocalizationstable within thesettings→iphone→plist2-character string value appropriate to the language, for example:
settings =
{
    iphone =
    {
        plist =
        {
            CFBundleLocalizations =
            {
                "en",  --English
                "es",  --Spanish
                "it",  --Italian
                "de",  --German
                "fr",  --French
                "ja",  --Japanese
                "ko",  --Korean
            },
        },
    },
}
- Add the
CFBundleDisplayNameandCFBundleNamekeys as the app defaults (see Project Build Settings for details). Note that these should reside inside theplisttable but outside theCFBundleLocalizationstable.
settings =
{
    iphone =
    {
        plist =
        {
            CFBundleLocalizations =
            {
                "en",  --English
                "es",  --Spanish
                "it",  --Italian
                "de",  --German
                "fr",  --French
                "ja",  --Japanese
                "ko",  --Korean
            },
            CFBundleDisplayName = "Princess",
            CFBundleName = "Princess",
        },
    },
}
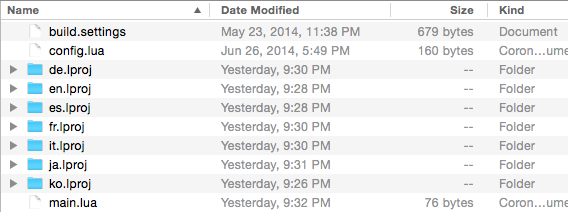
Localized Project Folders
The second step involves creating a localized project folder for each language in the root project directory alongside main.lua.
- For each language that you specified in the
CFBundleLocalizationstable withinbuild.settings, create a newxx.lprojfolder in the app’s root directory, wherexxrepresents the2-character language code.
Each folder must be appended with
.lproj. For instance, the proper folder name for English isen.lproj, not merelyen.Each folder must follow
case-sensitive naming. For instance, the proper folder name for English isen.lproj, notEN.lproj.
- Within each of these localized project folders, create a new text file titled
InfoPlist.strings:

- As the contents for each
InfoPlist.stringsfile, specify both aCFBundleDisplayNameandCFBundleNameline with the proper title for that language, for example:
English (en.lproj/InfoPlist.strings)
CFBundleDisplayName = "Princess";
CFBundleName = "Princess";
Spanish (es.lproj/InfoPlist.strings)
CFBundleDisplayName = "La princesa";
CFBundleName = "La princesa";
Korean (ko.lproj/InfoPlist.strings)
CFBundleDisplayName = "공주 패션쇼";
CFBundleName = "공주 패션쇼";
Language Testing
Once the above steps are complete, you can test the bundle names locally to ensure that the localized names appear.
Build the app as outlined in the Build Process section of the Provisioning and Building guide.
Install the app as described under Device Installation in the Provisioning and Building guide.
Change the device language setting via Settings → General →
Language & Region and choose one of the languages within your localization setup. If you configured everything as outlined, the app name should appear as the name you defined forCFBundleDisplayNamein the respectiveInfoPlist.stringsfile.
Changing the device settings must be done entirely at your own risk, especially in regards to language settings. If you change the device language, ensure that you understand the options and menus that will allow you to revert the device to your native language. Solar2D Labs cannot be held responsible for any settings changes that are conducted without reasonable caution.