Managing Large Blocks of Text
Some people attempt to create unusually large blocks of text in Corona only to find that it doesn’t work. The reason for this lies at Corona’s graphics core which is based on OpenGL. This means that almost everything on screen is a graphic… even text.
More specifically, in “native” apps, text is just an object on the screen, but in OpenGL, everything must be rendered as an image texture. Thus, to make text appear on screen, Corona takes the string value which you pass to display.newText() and it tells the operating system’s font engine to generate an image using the font metrics that you provide. Then, a Corona display object (texture) is returned and rendered on screen.
Why can this be a problem with very large blocks of text? Well basically, if you render an extremely long paragraph (or paragraphs) of text, you may exceed the device’s maximum texture size limit. In OpenGL, this maximum texture size is defined as the greatest pixel limit —
Fortunately, most modern devices support texture sizes of at least 2048 pixels and, for your convenience, Corona provides this information via the following system.getInfo() call:
system.getInfo( "maxTextureSize" )
Even considering a reasonable texture size limit of 2048 pixels, it’s not uncommon to exceed that amount when creating large blocks of text via a
About End-of-Line Encodings
Back in early computer history, there were two competing standards for defining the character sets used by computers: ASCII and EBCDIC. ASCII eventually ended up winning over EBCDIC and now almost everything, including macOS, Windows, Android, and iOS, are
ASCII includes the 26 capital letters, 26 lowercase letters, numbers, and various symbol characters in a single byte of data. In addition to the visible characters that you know, ASCII includes a series of control characters. In fact, the first 31 characters are control characters! These control characters can be used to control text positioning on the screen and their heritage goes back to old manual typewriters. Some of these include:
- CTRL-G — bell (character #7)
- CTRL-H — backspace (character #8)
- CTRL-I — tab (character #9)
- CTRL-J — line feed (character #10)
- CTRL-M — carriage return (character #13)
For those of us old enough to remember manual typewriters, a carriage return would return the typing head to the left side of the page. By itself, this would not advance the paper to the next line, so if you started typing after a carriage return, you’d overwrite the previous line. Thus, a second action called a line feed was needed to advance the paper a line.
Computers tried to mimic this system, however different operating systems approached it slightly differently. Microsoft DOS
Today, Android, macOS, and iOS are all based on Unix, so the more universal standard is to use a single
- CTRL-J =
^J=\n - CTRL-M =
^M=\r
To clarify, when you see the caret (^) it means \) it indicates an escape character, so in this case, \r is return\n is newline
Implementing Multi-Line Text
In Corona, there are two ways to render
Line Break Wrapping
One way of wrapping text to the next line is to simply define line breaks within the string that you pass to the display.newText() call. Because the operating systems for our mobile devices are \n are more commonly used. In fact, you may have seen examples of
local myString = "First line of text.\nSecond line of text.\nThird line of text."
Specifying multiple lines in this manner will be treated as separate visual lines of text in Corona.
Alternatively, you can use Lua’s
local myString = [[First line of text.
Second line of text.
Third line of text.]]
Note that in this case, you do not need to specify the newline (\n) markers like in the first version.

Now, if you pass this myString variable to display.newText(), you will get a predictable text output like the one shown here. At every point you specified \n (or started a new line of code in [[ ]] format)\n\n at the end of the first paragraph.
Width Wrapping
All modern design/layout applications which support text allow you to create a text box where the content — regardless of what
Conveniently, Corona supports this concept via the width parameter of display.newText(). By specifying a pixel width, you can instruct the text to line break at that point, for instance:
local myString = "The quick brown fox jumped over the lazy dog."

local myText = display.newText( myString, 30, 30, 200, 0, native.systemFont, 24 )
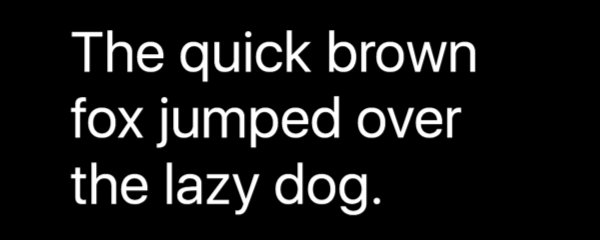
Here, the value of 200 in the display.newText() command instructs Corona to create a text box that’s 200 pixels wide, resulting in an output like the one shown here. The parameter of 0 immediately following indicates that the text box will be of flexible height, meaning that the rendered text object’s height will automatically adapt to whatever text string is provided. While you could potentially set a static height for the box, it’s generally not recommended because it may result in text content being visually clipped at the box’s lower boundary point.
Separating Long Text
If you’re creating an app like an
Fortunately, you can loop over a large string of text and, as mentioned above, break it into smaller blocks which can be rendered properly by OpenGL, ensuring that none of them exceed the maximum texture size limit. When doing so, one option is to split apart long blocks using the natural language concept of paragraphs. Let’s explore this further…
Initial Setup
For this tutorial, we’ll use some text generated by www.lipsum.com:
local myText = [[Lorem ipsum dolor sit amet, consectetur adipiscing elit. Quisque semper mollis erat a interdum. Praesent tristique diam in nulla varius, nec aliquet mauris posuere. Suspendisse pretium risus lacus, commodo lacinia sapien dictum et. Sed non varius felis. Curabitur elementum tortor non libero pulvinar, at convallis lectus varius. Interdum et malesuada fames ac ante ipsum primis in faucibus. Curabitur sit amet nunc congue, molestie erat vel, facilisis turpis. Morbi vitae diam ligula. Suspendisse purus turpis, commodo in aliquam id, lobortis a sapien. Sed at libero porta, aliquam odio nec, porta dui. In a congue velit. Aliquam ac quam feugiat, ultricies metus nec, porta neque. Phasellus posuere mollis magna, ac vestibulum ligula congue id. Pellentesque imperdiet aliquam lacus, ac pellentesque dui eleifend nec. Suspendisse auctor vehicula facilisis. Pellentesque id massa tincidunt neque luctus varius.

Cum sociis natoque penatibus et magnis dis parturient montes, nascetur ridiculus mus. Maecenas sit amet dapibus nulla. Suspendisse ut risus nulla. Maecenas varius elit non faucibus fermentum. Fusce rhoncus, nisl et varius tristique, enim felis egestas purus, et feugiat lorem urna a augue. Maecenas non pulvinar tortor. Aenean condimentum nibh id eros fringilla viverra. Fusce condimentum urna ut volutpat porttitor. Nunc tincidunt congue ligula.

Duis placerat felis varius, convallis massa sed, volutpat magna. Sed vitae viverra neque. Integer ac sollicitudin libero, at ornare purus. Aliquam egestas hendrerit tellus. Aliquam eu elit vitae lorem lacinia tempus. Proin vel dictum mi. Maecenas porttitor, justo a dictum volutpat, nisl libero dictum ligula, vitae posuere urna elit a quam. Nam arcu metus, semper suscipit pellentesque ac, tempor ut arcu. Vestibulum eu nibh erat. Pellentesque habitant morbi tristique senectus et netus et malesuada fames ac turpis egestas. Sed semper sollicitudin lorem, vel commodo libero commodo eget. Proin lacinia euismod elit vitae porttitor. Proin ipsum neque, dictum at dictum eu, egestas malesuada turpis. Nulla eros lectus, adipiscing eget velit sed, malesuada aliquam ipsum. Curabitur et egestas massa. Vestibulum luctus est est, tincidunt viverra nisi vulputate id.

Integer lobortis tellus eu ligula viverra egestas. Quisque commodo, massa vel pretium imperdiet, nisl enim euismod justo, sed ultricies lacus mi ut nisi. Maecenas molestie vitae magna non interdum. In gravida ornare orci in vulputate. Praesent suscipit lobortis dui ut interdum. Proin pulvinar metus ligula, a malesuada nunc interdum at. Aenean et scelerisque enim. Integer eget congue sapien. Etiam suscipit mauris neque, id semper quam volutpat vel. Proin venenatis dictum felis quis ultricies. Suspendisse feugiat mi congue ante gravida, id accumsan leo mollis. Lorem ipsum dolor sit amet, consectetur adipiscing elit. In hac habitasse platea dictumst. Nulla facilisi.

Nam arcu mauris, convallis sit amet dictum consequat, imperdiet at mi. Vestibulum velit erat, accumsan sit amet vehicula vitae, tempor id nisi. Quisque eu tellus vulputate nisi vestibulum tincidunt at vitae tellus. Quisque sed pretium nisl. Vivamus a aliquet purus. Integer pulvinar neque in dapibus pharetra. Quisque convallis urna vulputate ligula mattis dictum. Vivamus pharetra molestie nunc, ac rhoncus dolor euismod at. Cras fringilla sollicitudin sapien vel sagittis. Donec dignissim scelerisque mi nec pulvinar. Mauris at metus gravida, lacinia dolor quis, vehicula lacus. Donec a pellentesque tellus. Praesent sit amet lorem nisl. Pellentesque interdum felis quis vehicula vestibulum. Donec ut dolor tortor.
]]
Now let’s add some code to accomodate this large amount of text:
local widget = require( "widget" )

local scrollView = widget.newScrollView(
{
    top = 0,
    left = 0,
    width = display.contentWidth,
    height = display.contentHeight,
    horizontalScrollDisabled = true
})

local paragraphs = {}
local paragraph
local tmpString = myText

local yStart = 10
local mainPadding = 20
Let’s inspect this code in detail:
Because these five long paragraphs of text clearly won’t fit on the screen, they will be inserted into a widget.newScrollView(). Thus, we must first
require()the widget library (line 12) and create a new scroll view that occupies the full content area(lines 14-21) . Our text will output from top to bottom, so we restrict scrolling to vertical only by setting thehorizontalScrollDisabledparameter totrue.Following this, the
paragraphstable will hold the differentdisplay.newText()objects for each paragraph (the separated blocks). TheparagraphandtmpStringvariables will hold, respectively, the current paragraph text and a copy of the string with the current paragraph removed.The variable
yStartwill be used to position each paragraph, one after the next, with a value of10(pixels) to provide a little space before each new paragraph. You can, of course, adjust this value to suit your visual presentation. As formainPadding, we’ll use that to add some horizontal padding around each of the rendered text blocks.
Repeat Loop
To perform the main work, we’ll use a repeat-untilrepeat loop makes more sense than a while loop. Essentially, this loop will run until either tmpString is nil or the length of tmpString is 0.
repeat
    paragraph, tmpString = string.match( tmpString, "([^\n]*)\n(.*)" )
    paragraphs[#paragraphs+1] = display.newText( { text=paragraph, width=scrollView.width-(mainPadding*2), fontSize=14 } )
    paragraphs[#paragraphs].anchorX = 0
    paragraphs[#paragraphs].anchorY = 0
    paragraphs[#paragraphs].x = mainPadding
    paragraphs[#paragraphs].y = yStart
    paragraphs[#paragraphs]:setFillColor( 0 )
    scrollView:insert( paragraphs[#paragraphs] )
    yStart = yStart + paragraphs[#paragraphs].height
until tmpString == nil or string.len( tmpString ) == 0
Let’s explore what happens inside this loop:
First, we use string.match() to search the string for newline characters (
\n). Thiscryptic-looking search string basically tells Lua to capture the string in two parts: any number of characters that are not a newline ([^\n*]) up until the first newline encountered (\n). This is stored inparagraphand then the rest of the string is stored intmpString.With the variable
paragraphnow holding a single paragraph of text, we create the display object usingdisplay.newText(), passing the value ofparagraphas thetextparameter. By using#paragraphs+1as the loop index, it will create a new table entry at the end of theparagraphstable. On the lines following, we can then reference the new entry by using#paragraphsas the index.
Observe that the width parameter of the text object is set to scrollView.width-(mainPadding*2 —
Next, on
lines 33-36 , we position the text. To keep things simple, we change the anchor point for each text block to thetop-left corner of the display object, set the x coordinate asmainPaddingto provide some left padding, and set the y coordinate toyStart. Following this, onlines 37-38 , we change the text color to black and, finally, insert the paragraph into the scroll view.On the final line inside the loop, we increment
yStartby the height of the previous paragraph created. This will let you position the next block of text immediately below the previous one, providing the illusion that it’s one long block of text with a slight space between each paragraph.
Finishing Up
Finally, let’s increase the total scrollable height of the scroll view to provide a bit of vertical padding below the last paragraph:
scrollView:setScrollHeight( scrollView:getView().height + (mainPadding*2) )
That’s it! With this complete code, you can build scroll views with a nearly unlimited number of paragraphs, visually separated by an adjustable amount of pixels, featuring automatic line wrapping that adjusts to various fonts and font sizes.
Conclusion
Hopefully this tutorial has shown you how to construct long text blocks in Corona with just a little extra effort to circumvent the limits of texture size.